Adding a Titlebar Accessory View to a Window
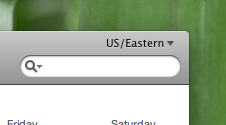
We've all seen it done before: some applications make great use of that dead space in the upper right-hand corner of the window chrome. Many applications choose to place a subtle reminder to register within a time period; others utilize it for an out of the way configuration option. Apple's own iCal uses it for selecting the timezone when timezone support is enabled in the Advanced settings:
Unfortunately, this practice is neither documented nor Apple-sanctioned, and there doesn't really seem to be a conclusive tutorial on making this work in a straightforward manner. As it turns out, adding a view to the top-right of a window (something I'll refer to here as a "titlebar accessory view") is surprisingly easy, and doesn't even use any undocumented APIs, just a little bit of common sense. As such, it's safe, and unlikely to break anytime in the future. You can even do it without any subclassing. Let me show you how.
The Background
Cocoa's windowing system, pretty much all the way up to the top level, is based on a hierarchy of NSViews. As you may already know, every window has a top-level view, called the content view, which contains all of the visible content displayed in a window. This view is nothing but an ordinary NSView — it's something you can even set yourself without issue — so it stands to reason that this view is contained by some other type of view.
Turns out it is: calling the -superview method of a window's content view returns an NSThemeFrame, which is a subclass of NSView. This view is responsible for containing the content view, in addition to all of the window chrome, the toolbar, etc. and so on. NSThemeFrame in and of itself is an undocumented class, but since we know it's also an NSView, that doesn't matter. We know that NSViews can have an arbitrary number of subviews, and it would stand to reason that we can simply add our accessory view as a subview of the NSThemeFrame and position it in the top right-hand corner. Right again.
All of this came from a few minutes of investigation of iCal using F-Script Anywhere. That means that this is (roughly) the way Apple does it; it also happens to be the simplest and most straightforward method I've found. Go figure.
The Code
Whenever I create a new project, I make it a habit to create a UI controller object that handles my app's interface. It isn't an absolute necessity, but it's good practice, so that's how I implemented this project.
// UIController.h
#import <Cocoa/Cocoa.h>

@interface UIController : NSObject {
	IBOutlet NSWindow *mainWindow;
	IBOutlet NSView *accessoryView;
}

// Methods
- (void)composeInterface;

@end
I created outlets for the window to which I want to assign my accessory view, and also an outlet for the view itself. I also added a signature for a -composeInterface method, which is another idiom I follow: I instantiate my UI controller in Interface Builder, and then make a message to composeInterface the first line of its -awakeFromNib method.
// UIController.m
#import "UIController.h"

@implementation UIController

#pragma mark Initializers
- (void)awakeFromNib
{
	[self composeInterface];

	// ... other awakeFromNib stuff
}

#pragma mark Methods
- (void)composeInterface
{
	// compose our UI out of views
}

@end
The next step is to create our accessory view in Interface Builder, and hook up our outlets. I chose to size my accessory view next to the window to which I was going to add it to give me a good sense of what the dimensions and padding should be. If you're using a toolbar, you'll want to make sure to disable the display of the toolbar button, either in Interface Builder or via code.
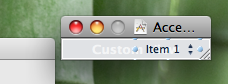
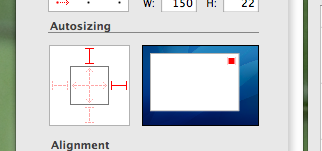
Configure the view autosizing such that the view itself is attached to the top-right of the containing view. That way, whenever someone resizes your window, your view will travel with it.
Now comes the time to implement the code that puts that all together. First, we get a reference to our elusive NSThemeFrame:
NSView *themeFrame = [[mainWindow contentView] superview];Next, we need to appropriately size and position our accessory view. For this, we get the frame of our NSThemeFrame, and the frame of our accessory view, and do some very simple math on it. Methinks you should be able to follow along:
NSRect c = [themeFrame frame]; // c for "container"
NSRect aV = [accessoryView frame]; // aV for "accessory view"
NSRect newFrame = NSMakeRect(
c.size.width - aV.size.width, // x position
c.size.height - aV.size.height, // y position
aV.size.width, // width
aV.size.height); // height
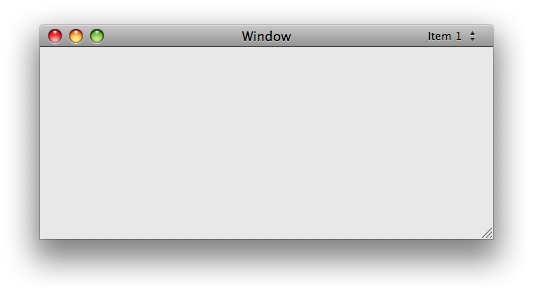
[accessoryView setFrame:newFrame];Now the accessory view's frame is set positioned at the top right-hand corner of our NSThemeFrame. The only remaining task is to add our accessory view.
[themeFrame addSubview:accessoryView];And that's all there is to it!
// UIController.m
#import "UIController.h"

@implementation UIController

#pragma mark Initializers
- (void)awakeFromNib
{
	[self composeInterface];

	// ... other awakeFromNib stuff
}

#pragma mark Methods
- (void)composeInterface
{
	// compose our UI out of views
	NSView *themeFrame = [[mainWindow contentView] superview];

	NSRect c = [themeFrame frame];	// c for "container"
	NSRect aV = [accessoryView frame];	// aV for "accessory view"
	NSRect newFrame = NSMakeRect(
			c.size.width - aV.size.width,	// x position
			c.size.height - aV.size.height,	// y position
			aV.size.width,	// width
			aV.size.height);	// height
	[accessoryView setFrame:newFrame];

	[themeFrame addSubview:accessoryView];
}

@end
Conclusion
As you can see, the containing view of a standard window — an NSThemeFrame — is nothing more than a special NSView; adding our own touches to the window chrome is relatively trivial.
I've packaged all of this code into an NSWindow subclass called AVWindow, which adds two methods to NSWindow: -titlebarAccessoryView and -setTitlebarAccessoryView:, which you can use to easily automate this process and make adding an accessory view a one-line affair.